If you need to remove FastLink VPN from your iPhone, this comprehensive guide will walk you through the entire process step by step. Whether you’re switching to another VPN service or simply no longer need VPN protection, we’ll show you how to properly uninstall FastLink VPN from your iOS device. The process involves deleting both the VPN profile and the app itself, and we’ll also cover what to do if you encounter any issues during removal. By following these instructions carefully, you can ensure that FastLink VPN is completely removed from your iPhone without leaving any residual files or configurations behind.
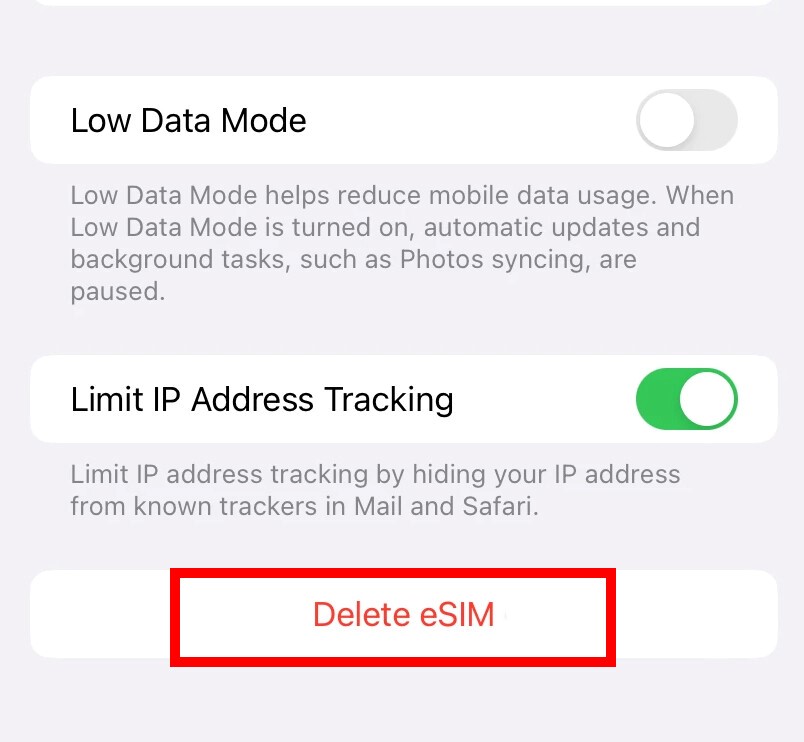
Table of Contents
- Why Remove FastLink VPN from Your iPhone?
- Before You Begin: Important Considerations
- Step-by-Step Guide to Remove FastLink VPN
- Troubleshooting Common Removal Issues
- What to Do After Removing FastLink VPN
Why Remove FastLink VPN from Your iPhone?
There are several reasons why you might want to remove FastLink VPN from your iPhone. Some users find they no longer need VPN services after their initial purpose is served, while others may be switching to a different VPN provider that better suits their current needs. Additionally, removing unused VPN configurations can help optimize your device’s performance and network connectivity. Whatever your reason, it’s important to properly uninstall the VPN to ensure no residual settings remain that could potentially interfere with your device’s normal operation or future VPN installations.
Another common scenario is when users experience connectivity issues and want to perform a clean reinstallation of FastLink VPN. In such cases, completely removing the existing installation is often the first troubleshooting step recommended by technical support teams. Some users might also be concerned about privacy and want to ensure all VPN-related data is erased from their devices. Whatever your motivation for removing FastLink VPN, this guide will help you accomplish the task efficiently and thoroughly.
Before You Begin: Important Considerations
Before proceeding with the removal of FastLink VPN from your iPhone, there are several important factors to consider. First, ensure you have any necessary login credentials or configuration details saved if you plan to reinstall the service later. Some VPN services require specific setup information that might be difficult to retrieve after uninstallation. Additionally, be aware that removing the VPN will immediately disable its protective features, so avoid conducting sensitive online activities until you’ve either reinstalled FastLink VPN or activated an alternative security solution.
It’s also wise to check if you have any ongoing subscriptions tied to your FastLink VPN account. While uninstalling the app won’t automatically cancel subscriptions, it’s easy to forget about recurring payments for services you’re no longer using. Finally, consider whether you might need to export any saved server preferences or connection histories before removal. Taking these preparatory steps will help ensure a smooth transition whether you’re temporarily removing FastLink VPN or permanently discontinuing its use on your iPhone.
Note: The steps in this guide apply to all recent versions of iOS, including iOS 15 and 16. While the interface might look slightly different across versions, the fundamental removal process remains the same. If you encounter any significant differences in your specific iOS version, consult FastLink VPN’s official support resources for version-specific instructions.
Step-by-Step Guide to Remove FastLink VPN
To completely remove FastLink VPN from your iPhone, you’ll need to delete both the app itself and its VPN configuration profile. Start by locating the FastLink VPN app icon on your home screen. Press and hold the icon until all apps begin to jiggle, then tap the “X” that appears in the corner of the FastLink VPN icon. Confirm the deletion when prompted. This removes the application but may leave behind configuration settings that need to be separately deleted through your iPhone’s settings menu.
Next, navigate to your iPhone’s Settings app and select “General,” then “VPN & Device Management.” Here you’ll find any installed VPN profiles, including FastLink VPN’s configuration. Tap on the FastLink VPN profile and select “Delete Profile.” You may need to enter your device passcode to confirm this action. After completing these steps, restart your iPhone to ensure all changes take effect properly. This two-step process ensures that both the application and its underlying network configurations are completely removed from your device.
Troubleshooting Common Removal Issues
If you encounter difficulties removing FastLink VPN from your iPhone, there are several troubleshooting steps you can try. One common issue is the VPN profile not appearing in the expected location within Settings. In this case, try searching for “VPN” in the Settings app’s search bar or look under “General” > “Profiles” (if available). Some iOS versions organize these settings differently. Another frequent problem is the “Delete Profile” option being grayed out, which typically indicates your device has management restrictions enabled that prevent profile modifications.
For persistent issues where FastLink VPN seems to leave residual configurations behind, a more thorough approach may be necessary. Try resetting your network settings by going to Settings > General > Reset > Reset Network Settings. Be aware this will erase all saved Wi-Fi passwords and network preferences. If problems continue, consider performing a full backup and restore of your iPhone, which typically resolves even the most stubborn configuration issues. Remember that FastLink VPN’s customer support team can also provide assistance with removal problems specific to their service.
What to Do After Removing FastLink VPN
After successfully removing FastLink VPN from your iPhone, there are several recommended follow-up actions. First, verify that the removal was complete by checking for any remaining VPN indicators in your status bar or Settings menu. If you’re switching to another VPN service, this is the ideal time to install and configure your new provider before resuming sensitive online activities. Consider running a quick internet speed test to confirm your connection is functioning normally without the VPN, as this can help identify any unexpected network configuration issues.
If you removed FastLink VPN due to performance concerns but still want VPN protection, you might explore alternative solutions that better suit your needs. Many VPN providers offer free trials or money-back guarantees, allowing you to test different services risk-free. Additionally, this could be a good opportunity to review your overall device security practices, such as enabling two-factor authentication for important accounts or reviewing app permissions. Properly removing unused applications like FastLink VPN is an important part of maintaining your iPhone’s security and performance over time.